 |
| More shelves and the rear of the Cordoba... |

Dedicated to complete restoration of '75 Cordoba. Complete with high definition pictures and detailed information to provide support for future projects.
Friday, November 23, 2012
Quick update
I kind of regained my motivation for the garage. I'm having a bit of a cold at the moment so I won't do any massive updates the next few days. However, I find it hard to stay out of the garage so yesterday I went to a tool shop to get some new equipment, mainly some new sets of shelves since I was running out of space and the floor became alarmingly filled with stuff. ;)
Also got a solution for trash disposal, spark tester, relay tester, battery/generator tester, a sturdier mallet and a mask to wear when dealing with bad fluids or particles... Hopefully I'll feel better tomorrow and at least have time for a smaller update... Take care you guys!

Tuesday, November 20, 2012
Day 20 - Thank you DynoDave!
Hey guys! Told you I would be a little bit more active, now let's just hope I'll keep it up! :) So, I would like to start by thanking one of my readers, DynoDave, who often writes spot on comments that are really helpful. Todays post will be about something he taught me. Also, I noticed my high definition pictures are automatically resized to a smaller size. Turns out I used all my free space. Sorry for this. Payday is on Friday, so I'll start paying for more space to ensure you guys get high definition pictures in the future.
That's it for todays post. I'm not sure how I will proceed but I think I will remove the exhaust pipes and mufflers since they are just hanging under the car at the moment. Stay with me and I will update as soon as I've been to the garage again!
 |
| This is the back seat of my Cordoba. As you can see it's in great shape! As described by DynoDave in previous comment: To remove the seat cushion, press inwards on the frame that can be felt through the fabric. Press firmly and close to the floor. Apply a little bit of lift and the cushion will spring back outwards. |
 |
| Took a few tries, but this is how it looks when it's released from the hooks that holds it in to place... |
 |
| ...and this is the hook and some arrows to show how the cushion is released. |
 |
| Underside of sofa looked pretty much brand new. |
 |
| And this is the back seat with the cushion removed. |
 |
| The seat back cushion is retained with two flat metal tabs that are folded over hoops in the bottom of the sofa. There is one on each side. I had to bend the metal tabs outwards in order to free the bottom. The top part of the seat is just placed on two hangers, so once the bottom is free, you can lift it straight up to remove it. |
 |
| Picture above shows where the hangers are and what it looks like with seat back cushion removed. |
 |
| In order to remove the carpet you also have to remove the covers and retainers for the front seat belts. |
 |
| In the bottom of the cover there are two plastic plugs. These needs to be removed first. I found it impossible to pull them out without destroying them so I will have to find something to replace them later. |
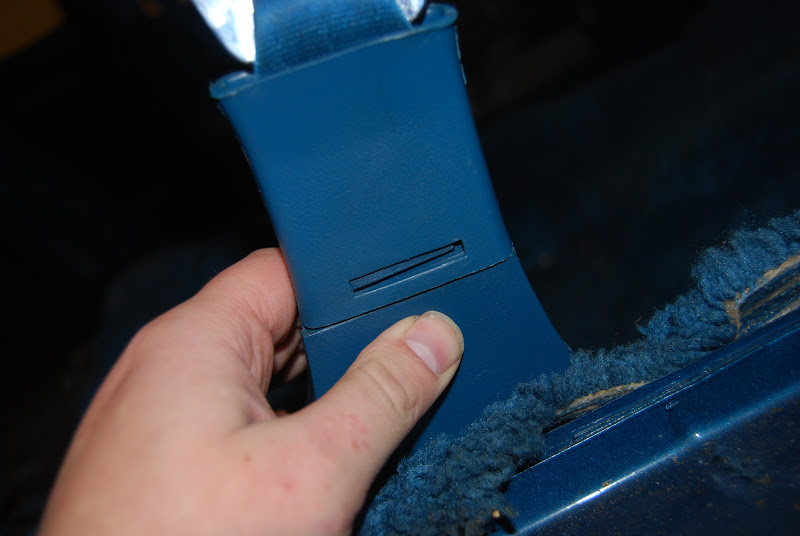 |
| Once bottom plugs are removed, the backside of the cover has a little latch. Press inwards on the bottom part and just pull the top part up. |
 |
| This will expose the bolt that holds the belt retainer to the floor. Also visible in this picture is the broken plug, still in place close to the bolt. |
 |
| Finally, to remove the carpet there are two plastic covers on both sides of the car. Remove the screw and pull away the bottom part. |
 |
| This is what the latest mentioned plastic cover looks like removed. |
 |
| A picture with the carpet removed. Notice there are lots of insulation pads. These are primarily for heat insulation, but I would assume they double as sound deadeners as well. This material can be found in the trunk as well and frankly it all feels a bit moist. My guess is these, once wet, absorbs the moist and causes rust. Any ideas what would be a good material to replace these with? |
 |
| Ouch! On both sides where the front seat is attached to the floor there is extensive rust. Will require a bit of welding but it looks like the rest of the floor is intact. I will have to remove insulation pads to be entirely sure though. |
 |
| After seats and carpet were removed I decided to do one final thing. This time in the engine compartment. I removed the heater/blower motor, as visible in picture, attached by 3 nuts. I replaced these when motor was gone, not to loose them. |
 |
| This is what the blower motor looks like on the inside. |
Saturday, November 17, 2012
Day 19 - Long time since update
If you have restored a vintage car yourself you will understand that sometimes the motivation just isn't there. Throughout this project I've had months of inactivity, and weeks with daily progress. I trust this is normal. For you who haven't restored a car yourself - I am sorry, but do not worry. This is a really important project to me, and I promise it will be finished one day. I had a couple of free hours this evening so this is the latest progress:
Okay. So that's about it for today. I will try to be a little bit more active the next few weeks so stay with me. Any thoughts or ideas? Be sure to post a comment! Thank you all!
 |
| Today I started by removing the bolts for the seat belts. DynoDave mentioned that these were just driven through the floor and that the nut on the other side was welded to the floor, and indeed he was right. It took a considerable ammount of force to remove these, and it was hard since I had to be in the back seat and had a bad angle. |
 |
| Once bolts were removed I tilted the seat backwards. I was alone so it was kind of hard to get the seat out the door... |
 |
| Turned out the seat was still stuck. Found this cable attached to something under the seat. I did not have time to investigate it further but I find it strange since I have no power seat, it only has a manual control. The cable was on the passenger side. What could this be? |
 |
| Finally, front seat out of the car. A bit dirty but in really decent shape being 37 years old. |
 |
| The floor carpet was really dirty, but finally I have a lot of space to take care of the interior trim! |
 |
| Removed the cover below the dash on the drivers side. Just fitted with one screw in the middle. |
 |
| And then on the passenger side. This is what it looks like behind. |
 |
| As a final action I started pulling the floor carpet. I won't be able to remove it until the back seat is out of the vehicle and at the moment I am not entirely sure how it is fastned, so any ideas are welcome. I could see some spots of rust that needs welding but I will have to take a closer look when the carpet is gone. |
Okay. So that's about it for today. I will try to be a little bit more active the next few weeks so stay with me. Any thoughts or ideas? Be sure to post a comment! Thank you all!
Tuesday, August 14, 2012
Day 17 and 18 - It's about time!
The weekend was absolutely amazing. My very good friend Jocke joined me for some solid hours in the garage, accompanied by some hard drinking nights! I have to admit the drinking took away a little of time from the garage, but we really managed to do a lot of things in limited hours. If you're reading this Jocke I really want to thank you for all your efforts, it's worth a lot!
So, here we go! The first intention was to remove the Torqueflite 727 transmission since it's been sitting there since engine removal and obstructing other stuff I need to do. DynoDave sent me a comment on my last post(thanks a lot for your input mate) regarding the way the seat belts are fastened through the floor. I might have been mistaken and I will try to verify this, DynoDave tells me it can be a nut that is welded under the floor so it's actually removable from the inside anyway, but if memory serves I think the nut from underside the floor is not welded. I'll be sure to get back on this!
So... I guess that's the end for now. I would love for you guys to comment on the above work. I'm still a novice and I might be mistaken regarding several details. One of the key reasons I have for doing this is to learn, so by ALL means. Correct me if I'm wrong! ;)
So, here we go! The first intention was to remove the Torqueflite 727 transmission since it's been sitting there since engine removal and obstructing other stuff I need to do. DynoDave sent me a comment on my last post(thanks a lot for your input mate) regarding the way the seat belts are fastened through the floor. I might have been mistaken and I will try to verify this, DynoDave tells me it can be a nut that is welded under the floor so it's actually removable from the inside anyway, but if memory serves I think the nut from underside the floor is not welded. I'll be sure to get back on this!
 |
| We started off by removing the driveshaft... |
 |
| This is the little bracket that keeps the universal joint intact, once removed, it can be disassembled with a few firm strikes by a hammer. |
 |
| To avoid a lot of transmission fluid coming out when sliding the drive shaft out of the transmission I removed all but four bolts on the transmission pan(it was not fitted with a drain plug). I then gently separated it from the transmission using a screwdriver. Be sure to catch the fluid in some kind of container - it's really bad stuff! |
 |
| With universal joint removed and oil gone, drive shaft was easily slid out of transmission. Notice how extremly clean the end in the transmission looks. Amazing! |
 |
| Now it's time to remove the torque converter. Remember it's also filled with fluid, so on removal, be sure to flip it outside down. This way oil is contained within and not a drop leaked for me. |
 |
| The wire from the spedometer was... beyond description. I can't understand how it was still operational when I started the project??? Fitting is obvious. |
 |
| To the left, the torque converter. To the right, the throttle rod linkage. It was only fitted with a clip to the throttle control lever. Now this is one of the areas of which I have the least knowledge,but from what I understand this controls the line pressure in the transmission. It is extremely crucial that this is assembled and adjusted properly, or the transmission will suffer early failure. The top part of it is connected to the carburetor linkage and pushes back on the throttle control lever depending on the throttle ammount. |
 |
| Kind of hard to take a photo of the levers on the transmission, but it's in the middle of the pic attached to the housing. As visible on the picture there are two levers. The below one is the gearshift control lever,and I believe it's used to change gears between drive, reverse, etc? Please correct me if I'm wrong. |
 |
| Since the transmission is also cooled from the radiator, the fluid lines needs to be removed. They are fitted to the transmission but I was unable to take better pictures than this. |
 |
| This is how the transmission bellhousing looks inside with torque converter removed. It's splined so on reassembly it's important to rotate the converter while pressing inwards lightly. |
 |
| This piece of frame is near the far back of the transmission and it really helps to remove it. Just two bolts secure it to a larger frame under the body, but it will allow for another 10-15 cm of clearance when removing transmission. There is also another bolt through it that holds the transmission secured to it. |
 |
| Since the piece of frame had been removed and clearance increased we slid a jack under it, with a piece of wood between it and the transmission pan to increase balance. We then heightened the transmission lightly and pushed the jack forward. Without removing the piece of frame we would have been forced to tilt the transmission and that would've made this a lot harder! |
 |
| This is me. Pretending I'm a mechanic. ;) Really satisfied to see the Torqueflite 727 outside the vehicle! |
 |
| The transmission/drive shaft tunnel. Looks really good underneath the Cordoba. Nice to know! |
 |
| The engine compartment is soon empty! |
 |
| At this point I had a tremendous sneeze-attack. So Jocke did some minor stuff meanwhile. This is the hood lock support plate. It was fitted with four bolts on the top, and two below. |
 |
| Here he is, the hardcore chevy enthusiast removing the condenser for the AC. This must've seriously disturbed airflow to the radiator. |
 |
| Some kind of filter for the AC. Right now I can't bother on what it is, it ain't going back anyway. Fitted with two bolts. At this time, transmission was out so we figured we should move on to the engine. |
 |
| This bracket was attached to the front of the right valve cover, obstructing the removal of it. |
 |
| We removed all the bolts securing the intake manifold. Good thing is it can be removed without removing the distributor which enables for easy access. Furthermore, it can actually be removed as an assembly with ignition coil and carburetor. |
 |
| The intake manifold was stuck. It's been sitting there for 37 or so years! Kind of a tense situation when a chevy enthusiast holds a hammer to my Chrysler 400 cui!! |
 |
| After removal we found this strange insulation material. Does anyone know what it's for? Possibly the front has also had this material, but if so it's long gone. |
 |
| The plate, for which I do not have the proper term, below the intake manifold was secured by this smaller plate with three bolts on one end... |
 |
| ...and furthermore two brackets served as another point of attachment. |
 |
| Valve cover removed on one side. A bit surprising everything looked really good inside. Then again I have papers to confirm the engine has only operated for 31 000 miles. |
 |
| Both valve covers and intake manifold removed... |
 |
| The rocker arms are fitted on a shaft assembly. 5 bolts held it into place and after removing, all rocker arms could be removed simoultaneously making it a lot easier to keep track of them. |
 |
| Rocker arm shaft assembly removed. Valve springs look great and have a lot of tension on them even after so long! |
 |
| At this point we decided it would probably be a good idea to put the engine on the engine stand. |
 | |
| Time to remove the cylinder heads. I was surprised to know these are 452's, according to information produced between '76 and '78. This is a '75 Cordoba so it shouldn't have them. However, there is no possible chance these have been changed so I'm guessing since this is a 400 high performance(which was introduced late in '75) it was one of the first engines with 452's. Can anyone please shed light on this? Any way, seems to be decent heads and I think I will reuse them. 12 short bolts and 5 long secured the cylinder head to the engine block. These bolts are NOT a good idea to reuse since they are basically destroyed on removal. |
 |
| Psycho with a hammer, that's what you get when cylinder head is stuck to the engine block! ;) |
 |
| And finally, a first gaze at the cylinders and pistons. A bit miscolored but in no other way did they seem damaged. These will be changed for Keith Black 240-030 pistons or maybe a domed alternative... |
 |
| The lifters were also in a stunning good condition. They will ofcourse be changed, but it's amazing to see 37 year old engine components that looks brand new! |
 |
| Cylinder heads removed. A lot of hard work behind this, but a thrill and incredibly educational for me as a novice mechanic! |
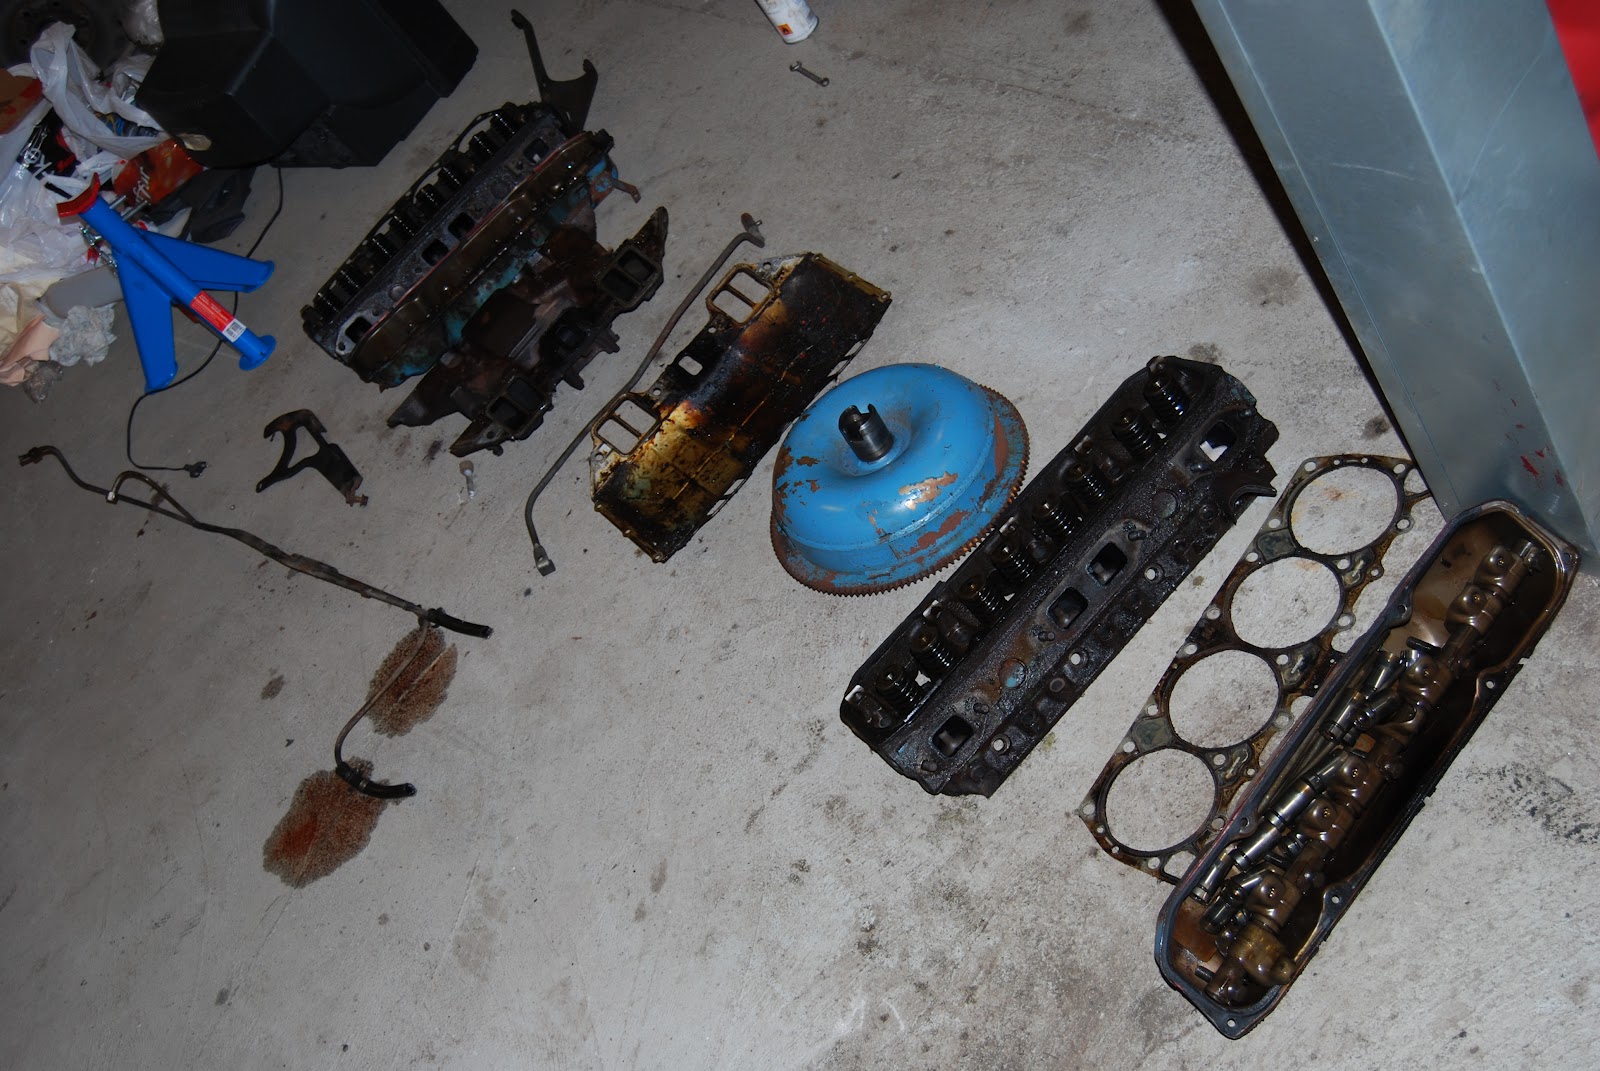 |
| A pile at the end of the day... |
 |
| Valve cover with rocker arm shaft assembly, lifters and push rods. Rods and lifters are mixed since I don't intend on reusing them. Otherwise it's absolutely crucial to keep track on which part goes where since they are differently worn. |
Subscribe to:
Posts (Atom)