 |
| More shelves and the rear of the Cordoba... |

Dedicated to complete restoration of '75 Cordoba. Complete with high definition pictures and detailed information to provide support for future projects.
Friday, November 23, 2012
Quick update
I kind of regained my motivation for the garage. I'm having a bit of a cold at the moment so I won't do any massive updates the next few days. However, I find it hard to stay out of the garage so yesterday I went to a tool shop to get some new equipment, mainly some new sets of shelves since I was running out of space and the floor became alarmingly filled with stuff. ;)
Also got a solution for trash disposal, spark tester, relay tester, battery/generator tester, a sturdier mallet and a mask to wear when dealing with bad fluids or particles... Hopefully I'll feel better tomorrow and at least have time for a smaller update... Take care you guys!
Tuesday, November 20, 2012
Day 20 - Thank you DynoDave!
Hey guys! Told you I would be a little bit more active, now let's just hope I'll keep it up! :) So, I would like to start by thanking one of my readers, DynoDave, who often writes spot on comments that are really helpful. Todays post will be about something he taught me. Also, I noticed my high definition pictures are automatically resized to a smaller size. Turns out I used all my free space. Sorry for this. Payday is on Friday, so I'll start paying for more space to ensure you guys get high definition pictures in the future.
That's it for todays post. I'm not sure how I will proceed but I think I will remove the exhaust pipes and mufflers since they are just hanging under the car at the moment. Stay with me and I will update as soon as I've been to the garage again!
 |
| This is the back seat of my Cordoba. As you can see it's in great shape! As described by DynoDave in previous comment: To remove the seat cushion, press inwards on the frame that can be felt through the fabric. Press firmly and close to the floor. Apply a little bit of lift and the cushion will spring back outwards. |
 |
| Took a few tries, but this is how it looks when it's released from the hooks that holds it in to place... |
 |
| ...and this is the hook and some arrows to show how the cushion is released. |
 |
| Underside of sofa looked pretty much brand new. |
 |
| And this is the back seat with the cushion removed. |
 |
| The seat back cushion is retained with two flat metal tabs that are folded over hoops in the bottom of the sofa. There is one on each side. I had to bend the metal tabs outwards in order to free the bottom. The top part of the seat is just placed on two hangers, so once the bottom is free, you can lift it straight up to remove it. |
 |
| Picture above shows where the hangers are and what it looks like with seat back cushion removed. |
 |
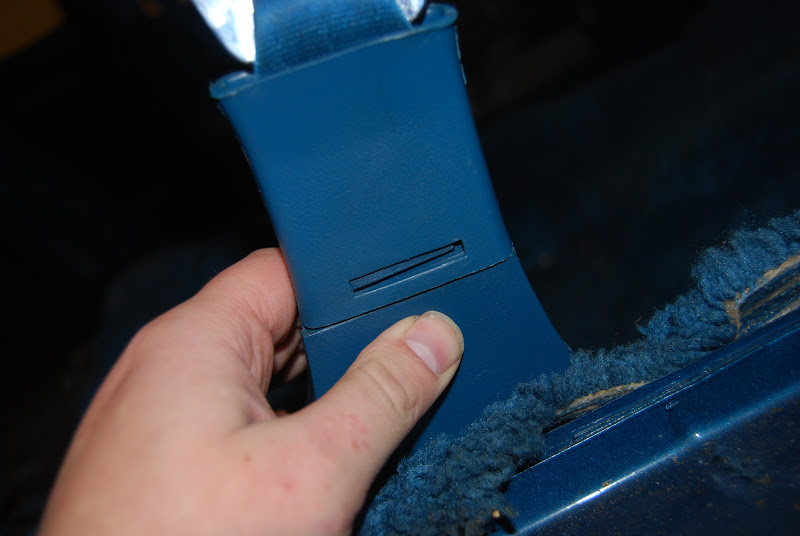
| In order to remove the carpet you also have to remove the covers and retainers for the front seat belts. |
 |
| In the bottom of the cover there are two plastic plugs. These needs to be removed first. I found it impossible to pull them out without destroying them so I will have to find something to replace them later. |
 |
| Once bottom plugs are removed, the backside of the cover has a little latch. Press inwards on the bottom part and just pull the top part up. |
 |
| This will expose the bolt that holds the belt retainer to the floor. Also visible in this picture is the broken plug, still in place close to the bolt. |
 |
| Finally, to remove the carpet there are two plastic covers on both sides of the car. Remove the screw and pull away the bottom part. |
 |
| This is what the latest mentioned plastic cover looks like removed. |
 |
| A picture with the carpet removed. Notice there are lots of insulation pads. These are primarily for heat insulation, but I would assume they double as sound deadeners as well. This material can be found in the trunk as well and frankly it all feels a bit moist. My guess is these, once wet, absorbs the moist and causes rust. Any ideas what would be a good material to replace these with? |
 |
| Ouch! On both sides where the front seat is attached to the floor there is extensive rust. Will require a bit of welding but it looks like the rest of the floor is intact. I will have to remove insulation pads to be entirely sure though. |
 |
| After seats and carpet were removed I decided to do one final thing. This time in the engine compartment. I removed the heater/blower motor, as visible in picture, attached by 3 nuts. I replaced these when motor was gone, not to loose them. |
 |
| This is what the blower motor looks like on the inside. |
Saturday, November 17, 2012
Day 19 - Long time since update
If you have restored a vintage car yourself you will understand that sometimes the motivation just isn't there. Throughout this project I've had months of inactivity, and weeks with daily progress. I trust this is normal. For you who haven't restored a car yourself - I am sorry, but do not worry. This is a really important project to me, and I promise it will be finished one day. I had a couple of free hours this evening so this is the latest progress:
Okay. So that's about it for today. I will try to be a little bit more active the next few weeks so stay with me. Any thoughts or ideas? Be sure to post a comment! Thank you all!
 |
| Today I started by removing the bolts for the seat belts. DynoDave mentioned that these were just driven through the floor and that the nut on the other side was welded to the floor, and indeed he was right. It took a considerable ammount of force to remove these, and it was hard since I had to be in the back seat and had a bad angle. |
 |
| Once bolts were removed I tilted the seat backwards. I was alone so it was kind of hard to get the seat out the door... |
 |
| Turned out the seat was still stuck. Found this cable attached to something under the seat. I did not have time to investigate it further but I find it strange since I have no power seat, it only has a manual control. The cable was on the passenger side. What could this be? |
 |
| Finally, front seat out of the car. A bit dirty but in really decent shape being 37 years old. |
 |
| The floor carpet was really dirty, but finally I have a lot of space to take care of the interior trim! |
 |
| Removed the cover below the dash on the drivers side. Just fitted with one screw in the middle. |
 |
| And then on the passenger side. This is what it looks like behind. |
 |
| As a final action I started pulling the floor carpet. I won't be able to remove it until the back seat is out of the vehicle and at the moment I am not entirely sure how it is fastned, so any ideas are welcome. I could see some spots of rust that needs welding but I will have to take a closer look when the carpet is gone. |
Okay. So that's about it for today. I will try to be a little bit more active the next few weeks so stay with me. Any thoughts or ideas? Be sure to post a comment! Thank you all!
Subscribe to:
Posts (Atom)