
So, here we go! The first intention was to remove the Torqueflite 727 transmission since it's been sitting there since engine removal and obstructing other stuff I need to do. DynoDave sent me a comment on my last post(thanks a lot for your input mate) regarding the way the seat belts are fastened through the floor. I might have been mistaken and I will try to verify this, DynoDave tells me it can be a nut that is welded under the floor so it's actually removable from the inside anyway, but if memory serves I think the nut from underside the floor is not welded. I'll be sure to get back on this!
 |
| We started off by removing the driveshaft... |
 |
| This is the little bracket that keeps the universal joint intact, once removed, it can be disassembled with a few firm strikes by a hammer. |
 |
| To avoid a lot of transmission fluid coming out when sliding the drive shaft out of the transmission I removed all but four bolts on the transmission pan(it was not fitted with a drain plug). I then gently separated it from the transmission using a screwdriver. Be sure to catch the fluid in some kind of container - it's really bad stuff! |
 |
| With universal joint removed and oil gone, drive shaft was easily slid out of transmission. Notice how extremly clean the end in the transmission looks. Amazing! |
 |
| Now it's time to remove the torque converter. Remember it's also filled with fluid, so on removal, be sure to flip it outside down. This way oil is contained within and not a drop leaked for me. |
 |
| The wire from the spedometer was... beyond description. I can't understand how it was still operational when I started the project??? Fitting is obvious. |
 |
| To the left, the torque converter. To the right, the throttle rod linkage. It was only fitted with a clip to the throttle control lever. Now this is one of the areas of which I have the least knowledge,but from what I understand this controls the line pressure in the transmission. It is extremely crucial that this is assembled and adjusted properly, or the transmission will suffer early failure. The top part of it is connected to the carburetor linkage and pushes back on the throttle control lever depending on the throttle ammount. |
 |
| Kind of hard to take a photo of the levers on the transmission, but it's in the middle of the pic attached to the housing. As visible on the picture there are two levers. The below one is the gearshift control lever,and I believe it's used to change gears between drive, reverse, etc? Please correct me if I'm wrong. |
 |
| Since the transmission is also cooled from the radiator, the fluid lines needs to be removed. They are fitted to the transmission but I was unable to take better pictures than this. |
 |
| This is how the transmission bellhousing looks inside with torque converter removed. It's splined so on reassembly it's important to rotate the converter while pressing inwards lightly. |
 |
| This piece of frame is near the far back of the transmission and it really helps to remove it. Just two bolts secure it to a larger frame under the body, but it will allow for another 10-15 cm of clearance when removing transmission. There is also another bolt through it that holds the transmission secured to it. |
 |
| Since the piece of frame had been removed and clearance increased we slid a jack under it, with a piece of wood between it and the transmission pan to increase balance. We then heightened the transmission lightly and pushed the jack forward. Without removing the piece of frame we would have been forced to tilt the transmission and that would've made this a lot harder! |
 |
| This is me. Pretending I'm a mechanic. ;) Really satisfied to see the Torqueflite 727 outside the vehicle! |
 |
| The transmission/drive shaft tunnel. Looks really good underneath the Cordoba. Nice to know! |
 |
| The engine compartment is soon empty! |
 |
| At this point I had a tremendous sneeze-attack. So Jocke did some minor stuff meanwhile. This is the hood lock support plate. It was fitted with four bolts on the top, and two below. |
 |
| Here he is, the hardcore chevy enthusiast removing the condenser for the AC. This must've seriously disturbed airflow to the radiator. |
 |
| Some kind of filter for the AC. Right now I can't bother on what it is, it ain't going back anyway. Fitted with two bolts. At this time, transmission was out so we figured we should move on to the engine. |
 |
| This bracket was attached to the front of the right valve cover, obstructing the removal of it. |
 |
| We removed all the bolts securing the intake manifold. Good thing is it can be removed without removing the distributor which enables for easy access. Furthermore, it can actually be removed as an assembly with ignition coil and carburetor. |
 |
| The intake manifold was stuck. It's been sitting there for 37 or so years! Kind of a tense situation when a chevy enthusiast holds a hammer to my Chrysler 400 cui!! |
 |
| After removal we found this strange insulation material. Does anyone know what it's for? Possibly the front has also had this material, but if so it's long gone. |
 |
| The plate, for which I do not have the proper term, below the intake manifold was secured by this smaller plate with three bolts on one end... |
 |
| ...and furthermore two brackets served as another point of attachment. |
 |
| Valve cover removed on one side. A bit surprising everything looked really good inside. Then again I have papers to confirm the engine has only operated for 31 000 miles. |
 |
| Both valve covers and intake manifold removed... |
 |
| The rocker arms are fitted on a shaft assembly. 5 bolts held it into place and after removing, all rocker arms could be removed simoultaneously making it a lot easier to keep track of them. |
 |
| Rocker arm shaft assembly removed. Valve springs look great and have a lot of tension on them even after so long! |
 |
| At this point we decided it would probably be a good idea to put the engine on the engine stand. |
 | |
| Time to remove the cylinder heads. I was surprised to know these are 452's, according to information produced between '76 and '78. This is a '75 Cordoba so it shouldn't have them. However, there is no possible chance these have been changed so I'm guessing since this is a 400 high performance(which was introduced late in '75) it was one of the first engines with 452's. Can anyone please shed light on this? Any way, seems to be decent heads and I think I will reuse them. 12 short bolts and 5 long secured the cylinder head to the engine block. These bolts are NOT a good idea to reuse since they are basically destroyed on removal. |
 |
| Psycho with a hammer, that's what you get when cylinder head is stuck to the engine block! ;) |
 |
| And finally, a first gaze at the cylinders and pistons. A bit miscolored but in no other way did they seem damaged. These will be changed for Keith Black 240-030 pistons or maybe a domed alternative... |
 |
| The lifters were also in a stunning good condition. They will ofcourse be changed, but it's amazing to see 37 year old engine components that looks brand new! |
 |
| Cylinder heads removed. A lot of hard work behind this, but a thrill and incredibly educational for me as a novice mechanic! |
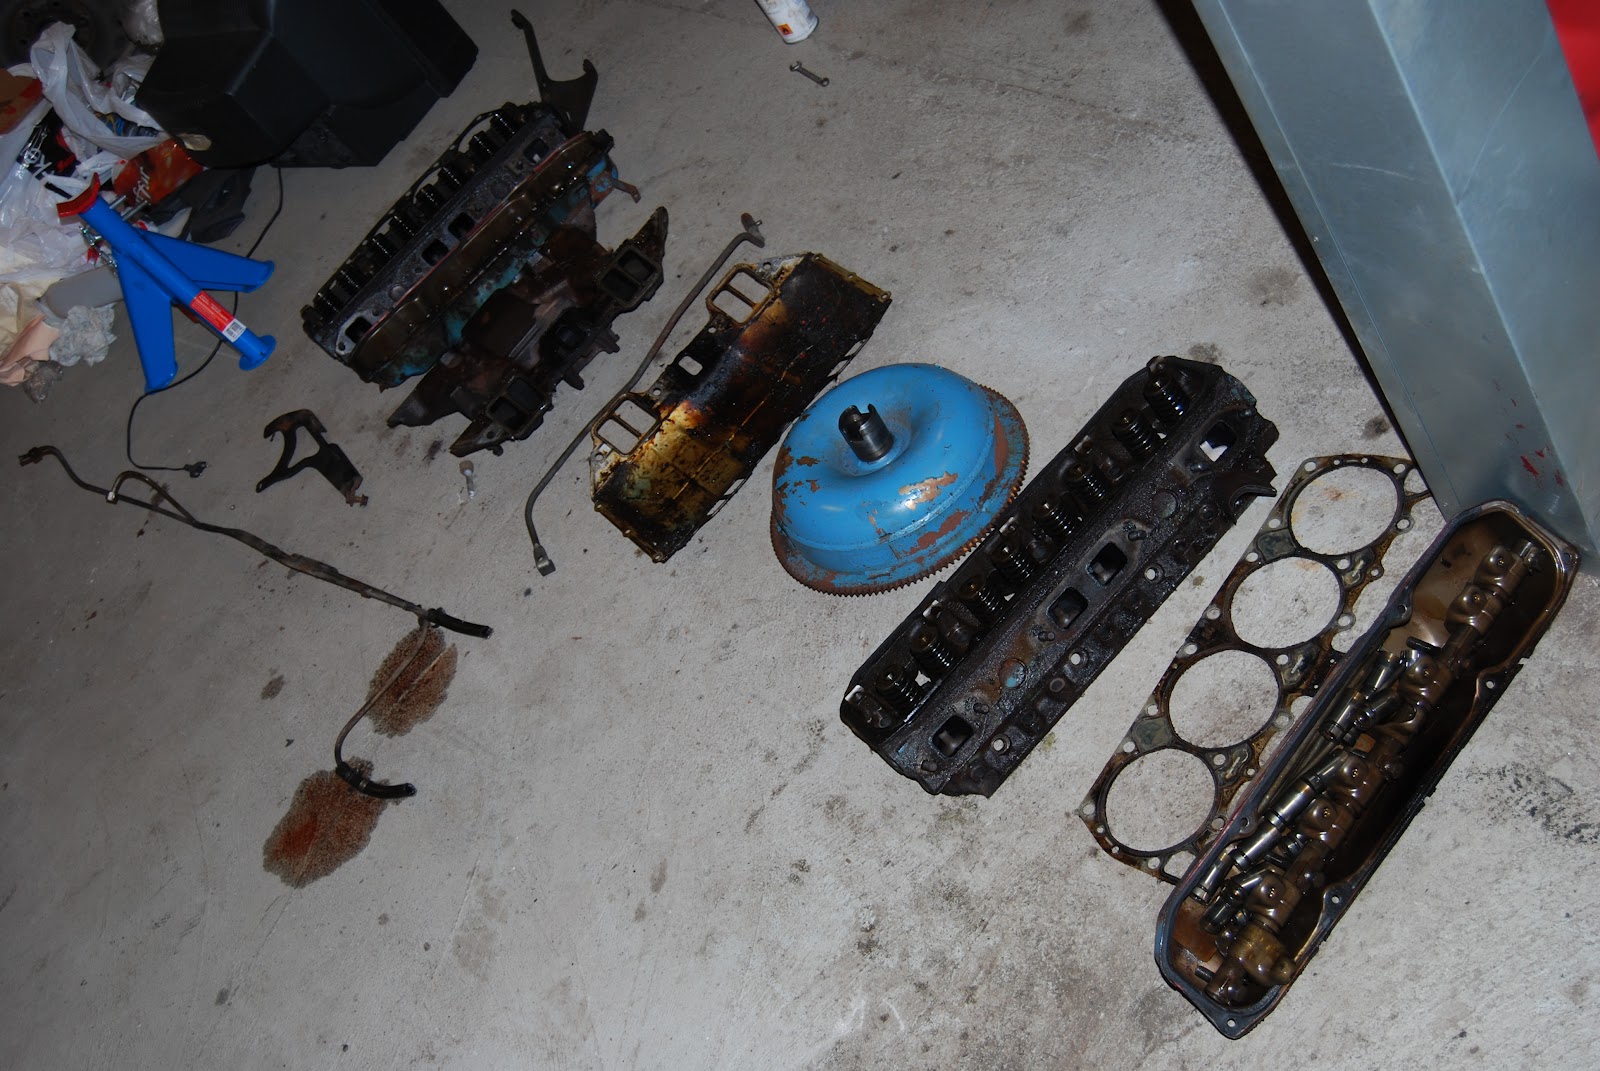 |
| A pile at the end of the day... |
 |
| Valve cover with rocker arm shaft assembly, lifters and push rods. Rods and lifters are mixed since I don't intend on reusing them. Otherwise it's absolutely crucial to keep track on which part goes where since they are differently worn. |