Thursday, January 12, 2012

Day 5 - Removing vinyl top

Sorry guys for not uploading these after I got home from the garage two days ago, I've been busy and the cold is killing me. Turns out removing the vinyl took a little more time than I expected, I took it really easy since I don't want to ruin anything related to this.

Vinyl top. Looks really rough and has been sitting there
for 37 years so it needs to be remade.

I started by gently bending the mouldings out with a screwdriver.
I believe it's important to just bend a little bit and then move along
around the mouldings to easen them all the way around.

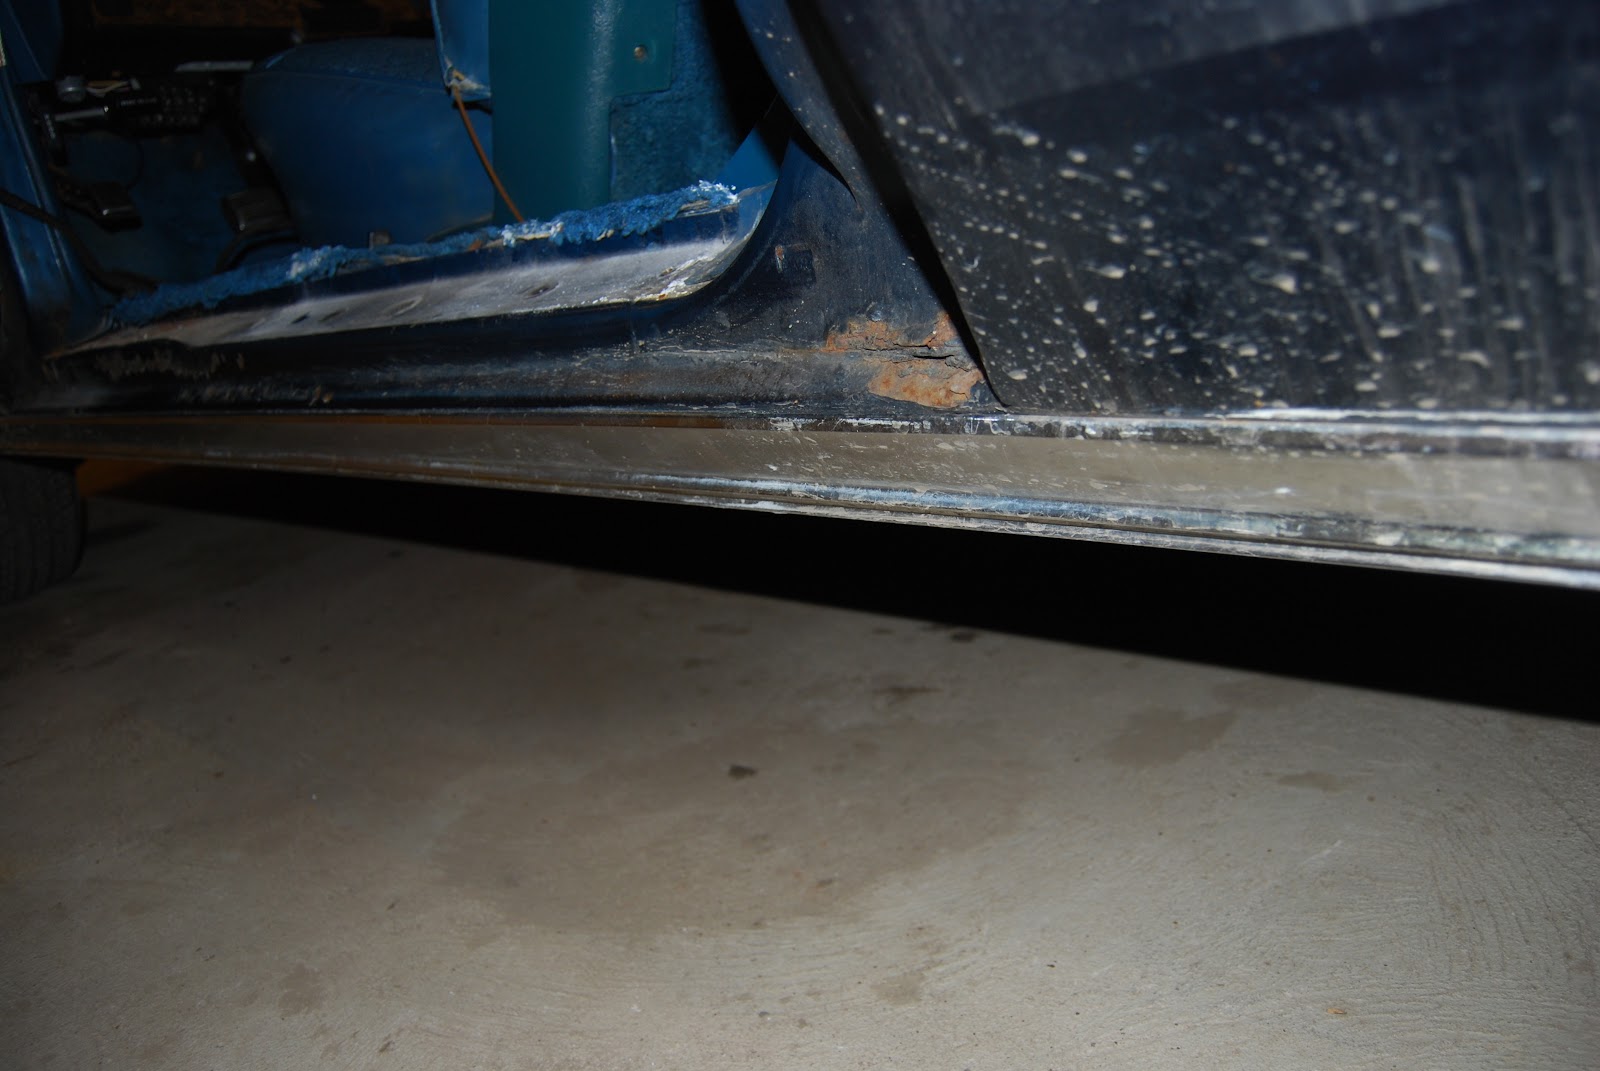
My first screw-up. I figured removing one of the moulding corners
would probably be the best way to start, turns out it was fitted with
a bolt that could be removed from inside the luggage compartment
and as visible on above picture I actually broke it. I do think this
can be fixed quite easily though.

Close-up of the screw-up. :)

When corner piece was gone, removing longer pieces were
easier, they are all fitted in with clips and can just be snapped off.
The mouldings seems to be made out of steel so be careful not
to bend them to much or they'll get distorted.

I found some pieces of moulding were easier removed by just
sliding them off the clips. Above I'm using a screwdriver to
slide off the entire bottom moulding closest to the trunk.

Rear window bottom moulding removed from clips.

Close-up of the clips. I think I might get some better shots
of these so that I can better explain how they work for you guys.

All the mouldings were fitted with clips and the only divergence
was the corner pieces. The two closest to the trunk are removed
from within the trunk and the ones on pic above(just in front of
Opera  Windows) are removed with a screwdriver.
There is one screw on each side.

Entire roof moulding removed.

This was kind of scary. I wasn't sure at all the same procedure
would apply for the window mouldings, but after VERY carefully
bending around the sides of it, I could see it would work.

After removing the window moulding it's visible
that some kind of weather sealer has been behind
but is seriously damaged from age and removal
of moulding. I would really appreciate tips on what I
can replace this with... Silicone?

The back side of the window moulding. As seen there are seven
"wings" around the edges that keep it in place. I haven't fully
understood how to replace this. Maybe the wings are bent in
place by pressing the moulding back on, or maybe they need
to be bent from the inside of the car. Anyone knows?

Removing the rear window moulding was probably the scariest
part. I did NOT want to damage the window, but the earlier approach
worked fine here as well. Trickiest part was to get one piece off
and required quite a bit of force, but once one was gone it was
easier removing the other ones.

Yet again fitted with clips and easiest removed by sliding off instead
of snapping off.

All vinyl top mouldings removed and labeled for reassembly.

Evidently it was time to remove these. Several years of nature
hid behind most of the mouldings. :)

As a side track. I was confused as to how the window mouldings
should be removed and I first thought they might be secured from
the inside of the car. So just in case I actually started by removing
the trim around the window from inside the vehicle.

It was fitted with screws and I think the below part has some kind
of clip in the middle because I haven't been able to remove it
fully just jet.

These are the screws for the rear window interior trim:
5 on the top, 2 on each sides and 2 on the bottom.

The top part of the rear window interior trim removed.


At the end of the day I had removed all of the mouldings, but I left the vinyl on. The reason is I need to check with the company that's going to redo these for me if they need it intact to get all the measurements. I tried carefully removing one corner of it but noticed it cracked very easily so I'm not sure I can remove it as one piece.

In two weeks a very good friend is visiting over the weekend and we are actually thinking we might use that time to remove the engine from the car. So I will spend the next two weeks removing anything obstructing the work(hood, fenders, front, bumpers, etc). Stay tuned for the next post! :)

Tuesday, January 10, 2012

Going to the garage tonight...

Tonight I'm going to spend a few hours in the garage. I intend to remove the vinyl top. I carefully bent the mouldings yesterday and I think I figured out how they are attached so I'm going to go for it. I am pretty certain I'm going to find some bad rust underneath so I'm not really looking forward to doing it.

But my intentions are clear with this project, I need to pull it apart and give it the best work I can. So even though removing the vinyl top feels kind of like "point of no return", I am commited to this. Check back later today for an update with pictures.

Friday, January 6, 2012

Question from DynoDave

I recieved a question from DynoDave and thought I would share the answer with everyone.

Hey DynoDave and thanks for you comment. Actually I used a not so conventional method and
 applied a very strong and weather resistant glue to the points seen below on both sides of the lens so it's attached to the socket. Good thing about this kind of glue is that it's easily removable if needed.

However, since the lamps can be pulled out from behind and the bezel, lens and socket can be removed by three housing attachment nuts I decided to leave it this way.

I guess we just have to live with eachothers differences and the occasional swearing over wrenches. ;)

Oh, and I will answer any comments containing questions, so if you guys need to know anything, just fire away. :)

Day 4 - Slowly getting somewhere

Yeah I know, I promised not to go to the garage until my cold was gone. But I just couldn't wait. I'm in a real spree right now so I figured I need to do as much as possible as soon as possible. :) Todays contribution to the blog:

Remember I unscrewed the lens for the turn signals on
the hood? Well it was time to remove the cable and lamp.

Two connectors are attached to the turn signals, they both look
different so it's not possible to get them wrong on reassembly.

Since the electrical cables will have to come out at some point I
wrote where they go. I might have to redo this with better material later.

I moved on to the position lights in the grill.

They are only secured with two nuts on each side.
The lamp will come out if you twist it clock wise.

Lens and bezel removed.

Lamp removed by turning clock wise.

More writing on electrical cables. I remembered at this point it
would probaby be a good idea to write driver or passenger side as well.

Grill, headlamps, position lights and turn signals removed.

On to the rear lighting. I think I recall that this lens and bezel
can be removed by just pulling them straight out. But I lost a
lens while cruising last summer and to avoid that happening
again I made sure they cannot be removed by force or cruise. ;)

Instead, it's possible to remove the entire socket from inside
the luggage compartment. It's secured with three housing
attachment nuts: 2 at the top, 1 at the bottom.

After removing all three bolts, and just pulling the lamps out
straight from behind the whole thing comes out.

This is what bezel, lens and socket looks like...

And it leaves a nice little hole in the body. :)

Some Cordoba stuff against the wall.

The great shelf I bought today together with
assorted Cordoba items removed from the car.

I will do my best to keep the entire project this clean and organized! :)
That's all for today friends! Be sure to comment if you have any questions, suggestions or just want to leave a message. Check back soon, I have a feeling I will do a lot more work the next few weeks!

Wednesday, January 4, 2012

Day 3 - More basic and minor disassembly

There are times when you shouldn't go to the garage... I caught a bad cold yesterday(again) but I really wanted to do something on the car project, so I went to the tool shop and got some new wrenches(inch type). Since I live in Sweden all my tools are based on the metric system, and thanks to you guys never wanting to use a real system I will have to get double sets of everything, stupid inches! ;)

Today my cold was no better, but my girlfriend called me at work and told me she had gotten the stomach flu. So I chose the lesser of two evils and took my chances with possibly making my cold worse and went to the garage. :)

I started by removing the vent below the door latch striker.

This is what it looks like removed. I disconnected the two cables
seen above.The connector I am holding goes to the post opera lamp.

Removing the post opera lamp bezel and lense is easy,
just one screw on the top.

The socket is secured with two screws and is
just as easily removed. It can stick to the vinyl
roof so carefully bend it loose using a screwdriver.

If the cables from behind the vent have been disconnected
the socket can just be pulled out with the cable attached to it.

This is what it looks like without post opera
lamp and vent below door latch striker.

I started to bag and tag all the details, screws and bolts I've
removed. There is no way I'm going to loose anything now. :)
I don't have a picture showing the tagging, but I wrote
the name of the part and "passenger" or "drivers side" on the bag.

More bags and my '89 Dodge RAM B350 in the background.

Just for fun, the other vehicle I own.

Mopar performance in the garage. ;)


So, that's about it for today. As soon as I've recovered from my cold I'll head out again. I think it's time to remove the rear lights and bumpers. Stay tuned and be sure to follow this blog!

Monday, January 2, 2012

Day 2 - Disassembly continues

I got some inspiration after recieving the manuals I mentioned in my latest post, so I spent a couple of hours in the garage once again. It's pretty darn cold in Sweden right now and I haven't had the chance to install any heating in the garage, shucks!


Anyway, todays post will be about a lot of minor stuff, but it needs to come off anyway, eh? Some of the stuff will ofcourse be very basic, but my intention is to document everything so that this information can be used by anyone wanting to restore their beloved mopar. ;)

With these, chances of me screwing up are smaller. ;)

I went on to remove the trim support bracket
and stabilizers for the glass in the door...

It was fitted with three bolts, two of them secured glass stabilizers
as seen above. The side pushing against the window is coated with a
rubber like substance to keep the window straight without damaging it.
After removing the three bolts, just lift the trim support bracket.


I went on to the fender side marker lamp which was secured with two screws...

...just like the quarter panel side marker lamp.

Both of the above lights hide a light bulb that needs to be turned
counterclockwise to be pulled out from the lamps... Pretty standard.

To remove the chrome bezel around the main lamps, loosen
the three screws found at the top left, top right and bottom
of the bezel. Do not confuse these with the adjustments
(right and top).

This way the bezel will come out without affecting the lamp itself...

The lamp is secured into it's socket with three screws as well.
You will only have to unscrew them a little, and then the lamp
can be turned clockwise so that the screws align with the larger
holes as seen above. The lamp will then pop out of the socket.

You've all seen this, but I thought it would be nice to take a picture
anyway. A standard connection for the lamp.

The cable for the lamp.

I then went on to remove the door steps which I believe are aluminum.
Four screws did the trick and it could just be lifted off.

On the drivers side my steps are damaged. Can anyone confirm this
is aluminum, and is there any method I can use to fix the holes above?

I really should've cleaned the car before this work started, but to make
a long story short I couldn't get it cleaned before winter and I have no
waterhose in the garage. I will have to clean each part after it has come off.
This is the rocker panel which is secured with two screws.

Behind the rocker panel are several plastic snap-in-contraptions,
so once the two screws are removed, you need to carefully push
the rocker panel upwards and lift it off from the top, this will release
it from the bottom as well. I think there were three or four of those.
Some rust hid there as well.

The removed rocker panel. Yeah, I know, I should've cleaned it. ;)
In difference from what the picture hints the rocker panels are quite
nice except for the dirt.

It's getting close to the end of the day...

And the result: I removed main lights, exterior lighting on the fenders
and on the quarter panels, the rocker panels, the trim support bracket
at the windows, and the aluminum(?) steps.
See, I told you it was a lot of minor stuff, but soon it's all gone and I can concentrate on moving further to more advanced disassembly. I'll try to get out there as soon as possible so I can update the blog frequently! ;)